Introduction
Welcome to Orion, we at Juno Innovations are so happy you chose to utilize our platform to help optimize your infrastructure. This guide is intended for first time users, who have just installed and deployed Orion. Here we will guide you through some of the basic first steps to getting up and running so you can harness the power of Orion.
Once installed you will be able to login to your Genesis admin dashboard. You can see our full indepth Genesis documentation here
Note
If you haven't already installed Orion please follow our install guide first.
Step 1: Setup Authorization Providers
By default, via our OneClick installer you will only have the BASIC authorization setup. If you customized your deployment
beyond the OneClick installer, and already setup your authorization you can skip this step.
Note
We recommend leaving the BASIC authorization available until you are able to confirm your authorization provider is configured and working properly. Otherwise you may risk locking yourself out of your Orion deployment. Once confirmed, we highly recommend removing the BASIC authorization.
Warning
While you can skip adding another more robust authorization provider, and continue using the BASIC authorization. We do not recommend the BASIC authorization for production environments. This is best used for testing, and development purposes.
1. Navigate to the Admin Settings Page
Only admins will have access to the Genesis Admin settings page. You can navigate to this page via the user profile drop down in the top right corner of Genesis.

2. Fill in Authorization Provider Form
Expand the authorization provider settings, and then expand your choice of provider. You can now fill out the provider form and submit your configuration. Once configured properly you should now have access to use this provider when logging into Orion.

Step 2: Install Orion Essentials Terra Bundle
Via our Terra app store you can easily install many different types of plugins directly into your cluster. Please see our Terra App store documentation for a full breakdown of how to navigate the ui and install plugins.
The Orion Essentials bundle installs the ArgoCD dashboard, giving administrators fast and convenient access to cluster deployments, along with our Helios workload schema.
Once installed, you can create Helios workload templates and start launching Helios containerized workstations within Orion.
To learn more about our different plugin types, including dashboards and workloads please see our Terra documentation
1. Navigate to the Terra App Store

2. Add the Official Source Repo

3. Install Orion Essentials Bundle
Now that the official repo has been added, use the search bar to search for the Orion Essentials bundle. Once found, click the plugin and fill out the install form.

Once installed you will see the ArgoCD dashboard within the Genesis navigation menu, and the Helios workload schema will now be available within the workload creation wizard.

Step 3: Create a Project
Within the Genesis admin dashboard, you can easily create new environments. We call these isolated environments projects.
You can learn more in our Project documentation including a detailed breakdown of how to create
a project.
1. Navigate to the Projects Page
Use the sidebar navigation to navigate to our projects page. Here you can see and manage your project environments.

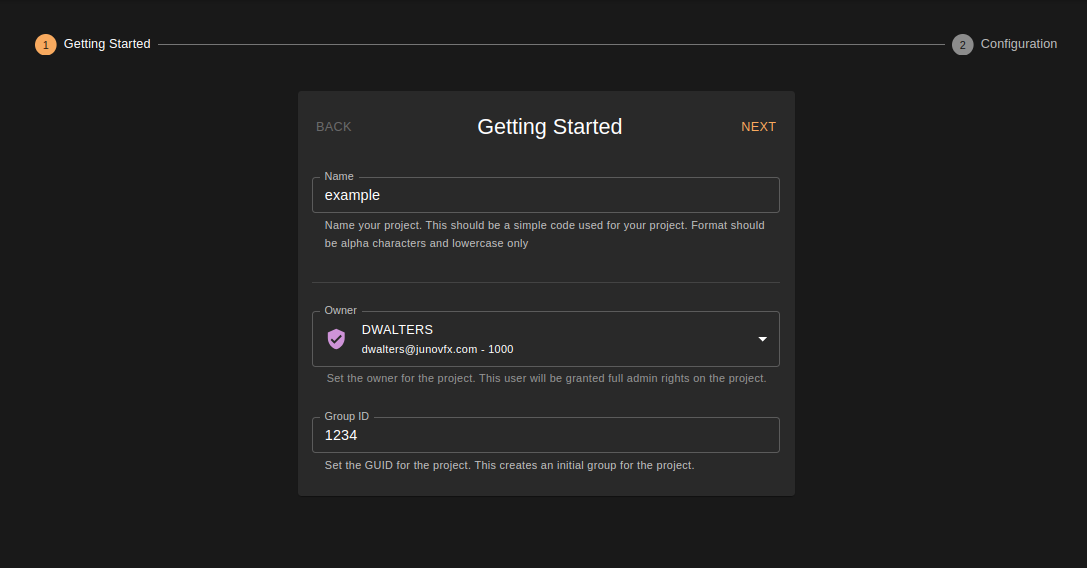
2. Create a Project
Click the "CREATE PROJECT" button, and fill out the project creation form. Please see our project documentation for more details.
2. Activate You Project
Now that you've created your project you will want to Activate the project. You can activate and hibernate a project at any time.
Hibernating a project will automatically scale down the project resources, saving you on your overall compute.
In the projects table, click the Activate button in your projects row. Once active, you will see the button shift to Hibernate
and the Connect button appear.

Step 4: Create a Workload
Now that you've installed Helios and created a project we can create a Helios workstation template to launch in our new project environment.
For more information about our open source Helios containerized workstations, please visit our Helios documentation
1. Navigate to the Workloads Page
Use the sidebar navigation to navigate to our workloads page. Here you can see and manage your workload templates. These templates can then be used to launch your containerized workloads within an Orion project.

2. Create a Workload
Click the "CREATE WORKLOAD" button. From there you'll want to select the Helios schema from the dropdown, and fill in the workload form. Please see our workload documentation for more details.

You will want to be sure to assign the newly created project to your templates groups. This will ensure your template is available in the project catalog for users to request and launch.

Step 5: Add and Modify your Nodes
If you utilized our OneClick on-prem installer
you may only have 1 node currently connected to your Orion cluster.
From the networking page, you can see your active nodes, adjust their labels, adjust their network policies, and if your cluster is an on-prem k3s cluster you will be able to add Ansible credentials and provision new nodes directly from this page.
For more information about our networking page please visit our Networking documentation
Note
In order for a workload to launch you will need to ensure you have at least 1 node labeled as workstation
1. Navigate to the Networking Page
Use the sidebar navigation to navigate to our networking page. Here you can see and manage your connected nodes

2. Add a Workstation Node
While, you can add more nodes to your cluster, for now lets just ensure we have at least 1 node with the workstation role
label applied. This will ensure we are able to launch and connect to our workloads.
Find a node in the table, and click the workstation button to apply the new label.

Note
Please note once you have finished your getting started tutorial, it is recommended you have at least 2 service nodes. Along with at least 1 workstation node.
Step 6: Connect to Your Project
Now that you have created a workload template, and have it assigned to your project. Lets connect to your project and launch up the workload.
1. Navigate to the Projects Page
Use the sidebar navigation to navigate to our projects page. Here you can see and manage your project environments.
2. Click the Connect Button
From the projects page, you should see your newly created project, and it should already be active. Simply click
the Connect button to connect to your project environment. From there you will be able to login and begin launching
your workloads.

Step 7: Launch a Workload
From here you should be logged into your project environments dashboard. We call this page Hubble. It's here you can begin launching and interacting
with your workloads.
To learn more about our project environment dashboard including launching and connecting to workloads please see our Hubble documentation
1. Navigate to the Workloads page
Use the sidebar navigation to navigate to our workloads page. Here you can see, manage, and request new workloads.

2. Navigate to the Workload Catalog
From the workloads page, you can either navigate directly to the catalog tab to see available workloads to launch,
or click the Request button.

3. Request a Workload
From the catalog page, you can search and filter your workload templates. Find and click the Helios workload
template you crated in the previous step.

You should now see a pop-up where you can view additional details and create your workload. Click the create button
to begin launching your workload.

4. Connect to Workload
Once your workload has been provisioned, and deployed you will be able to connect to it. Click the CONNECT button
to begin interacting with your workload.

Once you are done, simply click the trashcan icon to delete your workload, and scale your compute back down.

Conclusion
You have now successfully setup your Orion authorization, created a project, installed plugins, created a workload template, and launch a workload! This getting start tutorial is just the beginning. Please see our full product documentation to see all the Orion has to offer. We here at Juno Innovations not only hope Orion is able to revolutionize how you manage your infrastructure and compute, but also allows you to have fun while doing it.